


Everything You Need to Know About Solar Road Stud Installation and Maintenance
author: Eng. Jose
2025-01-22

Everything You Need to Know About Solar Road Stud Installation and Maintenance
Solar road studs are a valuable addition to road safety infrastructure, offering improved visibility, enhanced traffic guidance, and eco-friendly performance. Understanding the installation and maintenance processes of these road studs ensures that they operate at peak performance and longevity. This guide provides a comprehensive look into installing and maintaining solar road studs, with specific attention to tools, materials, and best practices.
Product Specifications(For example)
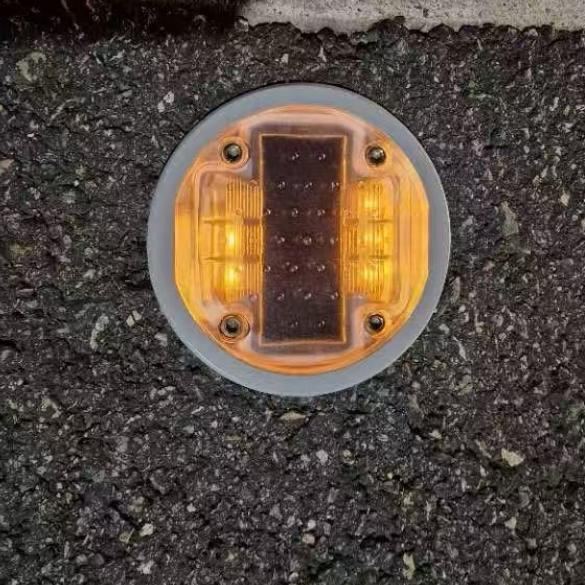
Before starting the installation, it’s important to familiarize yourself with the solar road stud’s dimensions:
-
Top Diameter: 140mm
-
Bottom Diameter: 123mm
-
Recommended Drill Bit Diameter: 127mm
These dimensions are essential when choosing the proper tools and ensuring accurate installation.
Tools and Materials Required
For a successful installation, the following tools and materials are needed:
-
Concrete Core Drilling Machine: This is the primary tool for drilling the hole for the road stud. Ensure that the drilling machine meets the specifications to handle the required diameter.
-
Drill Bit: A 127mm diameter drill bit is necessary to create a proper hole for the road stud.
-
AB Glue: A 1:1 ratio of AB glue is required for securing the road stud. Approximately 30-50 grams of glue will be needed for each installation.
-
Cleaning Tools: Proper cleaning tools ensure the drilled hole is free from debris and moisture, providing a clean surface for the glue to adhere to.
Installation Steps
1. Drilling the Hole
Using the concrete core drilling machine, drill a hole at the desired location on the road surface. The hole should have a 127mm diameter, which matches the recommended size for the solar road stud.
Ensure that the hole is deep enough to accommodate the stud securely.
2. Preparing the Hole
Once the hole is drilled, it's critical to thoroughly clean the hole to remove any debris, dust, or moisture. A dry, clean hole ensures that the glue will bond properly to the surface, preventing any premature loosening of the road stud.
3. Applying the Glue
Next, mix the AB glue in a 1:1 ratio. For each solar road stud, you’ll need approximately 30-50 grams of glue. Apply the glue evenly into the hole, ensuring that it covers the entire base area. This will provide a strong adhesive foundation for the road stud.
4. Placing the Solar Road Stud
Carefully place the solar road stud into the drilled hole. Align the lighting lens of the road stud in the correct direction for optimal visibility and guidance (e.g., for warning or directional purposes). Press down gently to ensure the stud is securely in place.
5. Drying Time
Allow the AB glue to dry and set for at least 4 hours before moving on. It is crucial to avoid disturbing the area during this time to ensure that the road stud adheres properly to the surface.
6. Finalizing the Installation
Once the glue has dried completely, the installation area is ready for human and vehicular traffic. Check the road stud’s position to ensure it is secure and correctly aligned.

Charging Recommendations
Due to possible transportation or storage conditions, the solar road stud may lose power before installation. Here’s how to ensure the stud is properly charged:
-
Before installation, charge the solar road stud for 3-5 days under direct sunlight.
-
Alternatively, after installation, allow 3-5 days for the solar road stud to charge fully before checking its functionality.
This charging period ensures that the solar-powered road stud is ready to perform and provide consistent illumination.
Maintenance Tips
1. Regular Inspections
Regularly check the road studs for any signs of wear or damage, such as cracks, water infiltration, or loss of LED brightness. If necessary, clean the surface to remove dirt or debris that may reduce the stud’s visibility.
2. Battery Maintenance
If you notice that the road stud is not charging efficiently or the LEDs are dimming, inspect the solar panel and battery. Solar road studs are designed for long-lasting use, but replacing the battery may be necessary after several years of operation.
3. Cleaning the Solar Panel
To ensure maximum efficiency, periodically clean the solar panel to remove dust, dirt, or other particles that could block sunlight and reduce its charging capacity.
Important Notes for Installation
-
Follow the manufacturer’s guidelines for tools, materials, and installation techniques to ensure optimal performance.
-
Check the environmental conditions before installation. Avoid working during rain or extreme humidity, as moisture can interfere with the glue setting process and affect the road stud's performance.
-
Always ensure the solar road stud is properly charged before use to guarantee its visibility and effectiveness.
Conclusion
The proper installation and maintenance of solar road studs are key to ensuring their longevity and high performance. By following the detailed steps for installation, preparing the necessary tools, and ensuring proper charging and maintenance, businesses and individuals can enjoy the full benefits of these eco-friendly, highly durable, and cost-effective traffic safety solutions.
Understanding the Technology Behind Solar Road Studs: How They Work
Durability and Performance: Why Solar Road Studs are Built to Last
Related Article
Wired LED Road Studs provide stable illumination and reliable road guidance for highways, tunnels, and traffic engineering projects with durable design and reduced maintenance needs.
Why Wired LED Road Studs Are Ideal for Highway and Tunnel Applications?

Road safety manufacturer explains solar road stud color selection for sharp curves and long downhill sections. Compare white, green, amber, and red light performance under low illumination and foggy conditions. Custom solutions available.
Roadway Delineation: Why White or Green Solar Road Studs Are Recommended for Sharp Curves and Long Downhill Grades

Discover the difference between 6000K, 4000K, 3000K, and 2500K solar road stud color temperatures. Learn how to choose the best warm white solar road studs for highways, cycle lanes, pedestrian pathways, parks, and landscape lighting projects.
Choosing the Right Warm White Color Temperature for Solar Road Studs

Coastal high-salt environments accelerate road infrastructure corrosion. Embedded solar road studs with corrosion-resistant materials and IP68 protection help improve night visibility and extend maintenance cycles.
Why Do Coastal High-Salt Environments Require Corrosion-Resistant Embedded Solar Road Studs?