


How to Apply a Solar Road Stud on the Road
author: Eng.Jose
2025-03-31
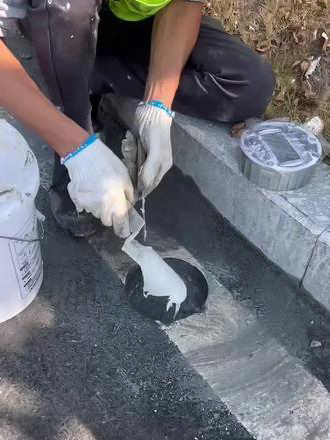
How to Apply a Solar Road Stud on the Road
Installing solar road studs properly ensures durability, visibility, and safety. Follow our lubaosolar these step-by-step instructions for correct installation:
Step 1: Preparation
-
Choose the Right Location
-
Ensure the surface is flat, clean, and dry.
-
Identify the best position for maximum solar exposure.
-
Follow local traffic safety regulations.
-
-
Mark the Installation Spots
-
Use chalk or markers to indicate where each stud will be placed.
-
Maintain proper spacing between studs (typically 3-5 meters apart).
-
Step 2: Surface Preparation
-
Clean the Road Surface
-
Use a wire brush or blower to remove dust, dirt, and debris.
-
Ensure the area is completely dry before installation.
-
-
Drill the Hole (For Embedded Studs Only)
-
Use a core drill to create a hole of the required depth and diameter.
-
Clean out dust and ensure a smooth hole for better adhesion.
-
Step 3: Apply Adhesive
-
Choose the Right Adhesive
-
Use epoxy resin, bitumen glue, or high-strength road stud adhesive.
-
Ensure the adhesive is weather-resistant and fast-curing.
-
-
Apply the Adhesive
-
Spread the adhesive evenly on the bottom of the solar stud.
-
If embedded, apply adhesive inside the drilled hole as well.
-
Step 4: Installing the Solar Stud
-
Place the Stud Firmly
-
Press the solar road stud into the adhesive.
-
Ensure it is level with the road surface.
-
-
Check Alignment
-
Align the stud properly with the road marking for uniformity.
-
Adjust before the adhesive dries.
-
Step 5: Curing and Testing
-
Allow the Adhesive to Dry
-
Let it cure for 6-8 hours (or as per adhesive instructions).
-
Avoid traffic exposure during this period.
-
-
Test the Solar Stud
-
Check if the LED lights function properly.
-
Ensure the solar panel is receiving sunlight.
-
Step 6: Final Inspection
-
Ensure Stability
-
Apply weight or pressure to verify adhesion strength.
-
Confirm there are no loose studs.
-
-
Open the Road for Use
-
Once everything is secured, remove any barriers.
-
Monitor for performance and maintenance.
-
Tips for Better Performance
✅ Use high-quality adhesive to prevent detachment.
✅ Install on dry days to ensure proper adhesion.
✅ Regularly clean the solar panel to maintain brightness.
✅ Choose the right stud type (embedded or surface-mounted) based on road conditions.
✅ Install on dry days to ensure proper adhesion.
✅ Regularly clean the solar panel to maintain brightness.
✅ Choose the right stud type (embedded or surface-mounted) based on road conditions.
Should Solar Road Studs Flash or Not?
LS-01A: The Future of Durable Raised Solar Road Studs
Related Article
Wired LED Road Studs provide stable illumination and reliable road guidance for highways, tunnels, and traffic engineering projects with durable design and reduced maintenance needs.
Why Wired LED Road Studs Are Ideal for Highway and Tunnel Applications?

Road safety manufacturer explains solar road stud color selection for sharp curves and long downhill sections. Compare white, green, amber, and red light performance under low illumination and foggy conditions. Custom solutions available.
Roadway Delineation: Why White or Green Solar Road Studs Are Recommended for Sharp Curves and Long Downhill Grades

Discover the difference between 6000K, 4000K, 3000K, and 2500K solar road stud color temperatures. Learn how to choose the best warm white solar road studs for highways, cycle lanes, pedestrian pathways, parks, and landscape lighting projects.
Choosing the Right Warm White Color Temperature for Solar Road Studs

Coastal high-salt environments accelerate road infrastructure corrosion. Embedded solar road studs with corrosion-resistant materials and IP68 protection help improve night visibility and extend maintenance cycles.
Why Do Coastal High-Salt Environments Require Corrosion-Resistant Embedded Solar Road Studs?